Install Joring
Install the browser extension and the desktop app, approve the macOS network extension, and confirm Joring is capturing your AI work.
Joring captures your AI work from two places. Most people need only the browser extension. Add the desktop app if you also use Claude Code, Codex, Claude Desktop, Microsoft 365 Copilot, Teams, or Slack AI.
Browser extension
Install it
Joring supports Chrome, Edge, Firefox, and Safari. Install from your browser's extension store, then pin it so the side panel is one click away.
If your organization deploys software through MDM, do not install it yourself. Your administrator will push it to you.
Sign in
Open the side panel and sign in with the account you use for Joring. The extension stays signed out until you do, and captures nothing in the meantime.
Desktop app
The browser extension does not see terminal or native app traffic. The desktop app covers those. It uses signed, source-scoped network rules; it does not install provider hooks or read provider files.
The macOS install has one step that is easy to get wrong, so it is written out in full below, with screenshots.
macOS
Joring runs on macOS 15 or later, on Apple silicon and Intel Macs, from one universal download.
Download and install the app
In Joring, click Set up Joring at the bottom of the sidebar, open the Desktop App tab, and click the .dmg download button. You can also download it directly: Joring-macos-universal.dmg.
Open the downloaded file and drag Joring onto the Applications folder shown next to it. Then open Joring from your Applications folder. The first time you open it, macOS asks whether you are sure you want to open an app downloaded from the internet. Click Open.
Joring has no Dock icon and no main window. It runs from the menu bar, so once it is open look for the Joring icon at the top right of your screen.
Click Start capture
Click the Joring menu bar icon. The setup window opens on Complete Joring setup. Click Start capture.
macOS now needs your approval before Joring can see traffic from native apps and the terminal. Joring opens System Settings to the right page for you, and the setup window keeps waiting in the background. If System Settings did not come to the front, or you dismissed the system alert, the next step shows how to get there yourself.
Turn on the Joring network extension
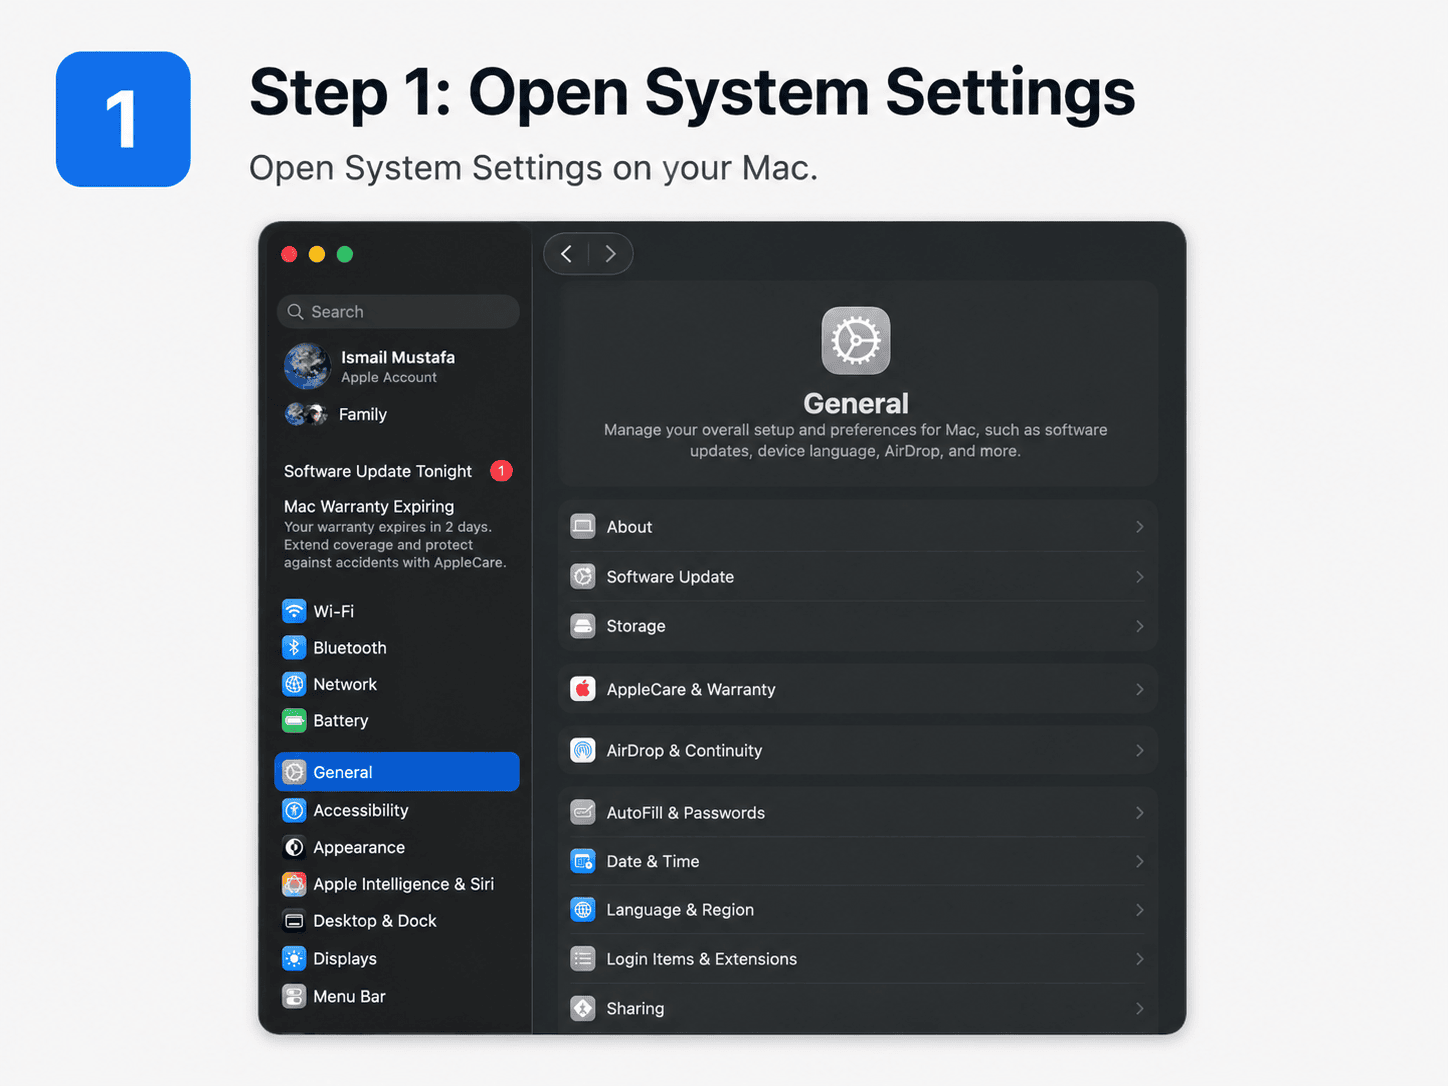
This is the step that matters. macOS asks for this approval once, per user, and until you give it the desktop app captures nothing at all. Nothing here is a Joring window: every screen below is macOS System Settings.
1. Open System Settings on your Mac.
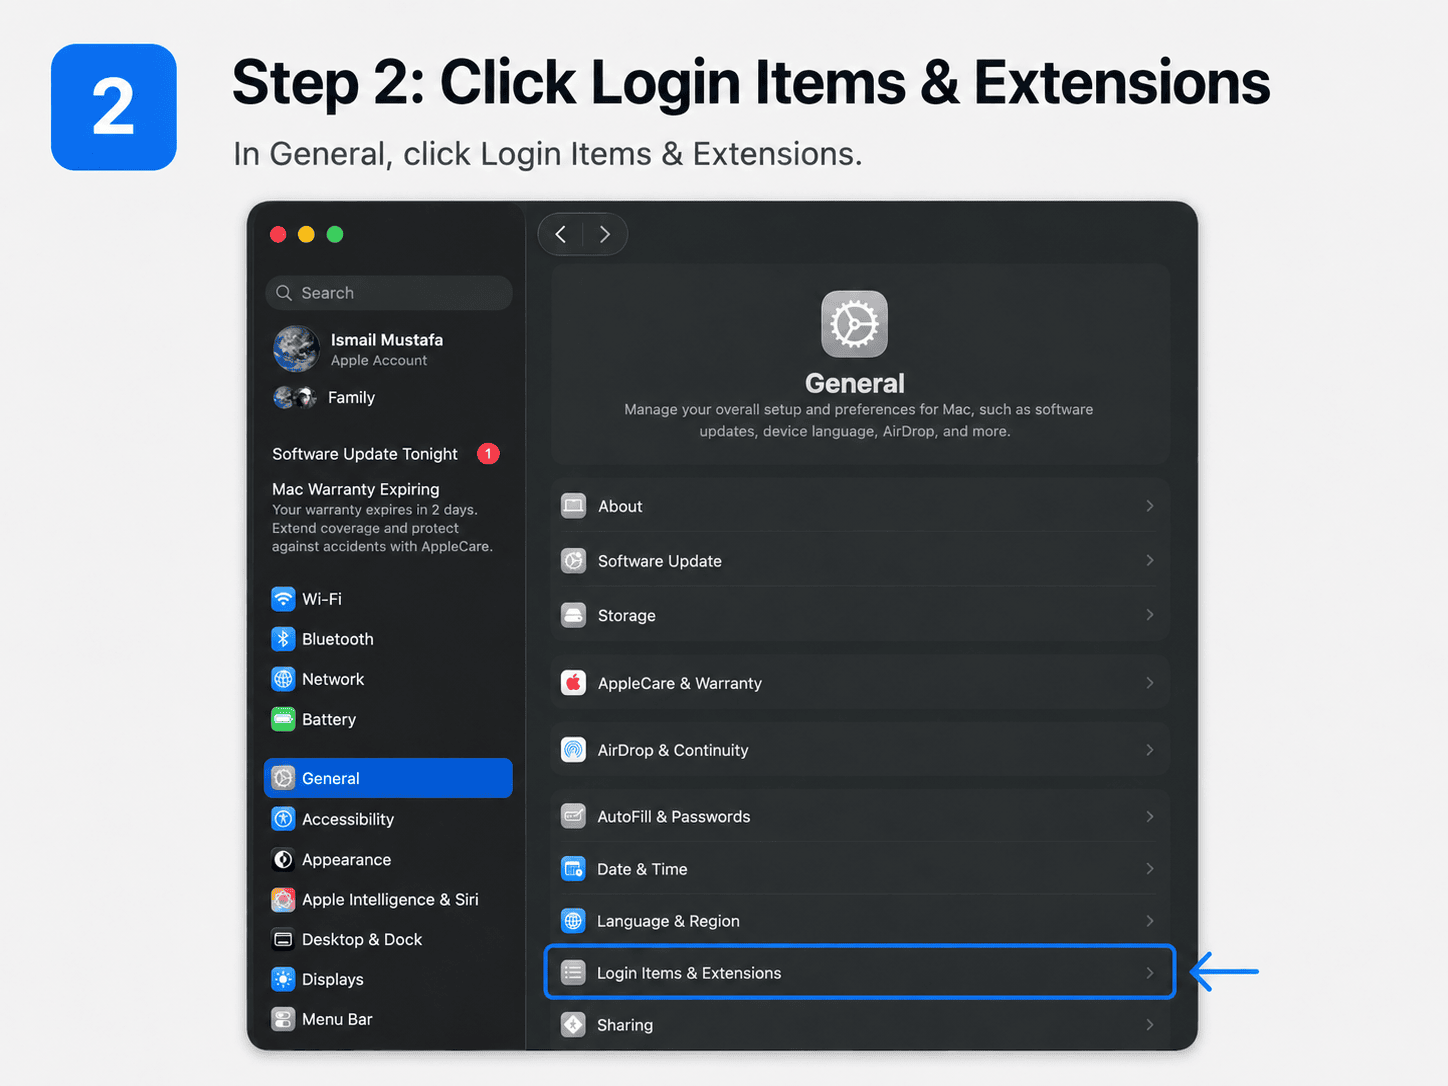
2. In General, click Login Items & Extensions.
It is near the bottom of the list, under Language & Region.
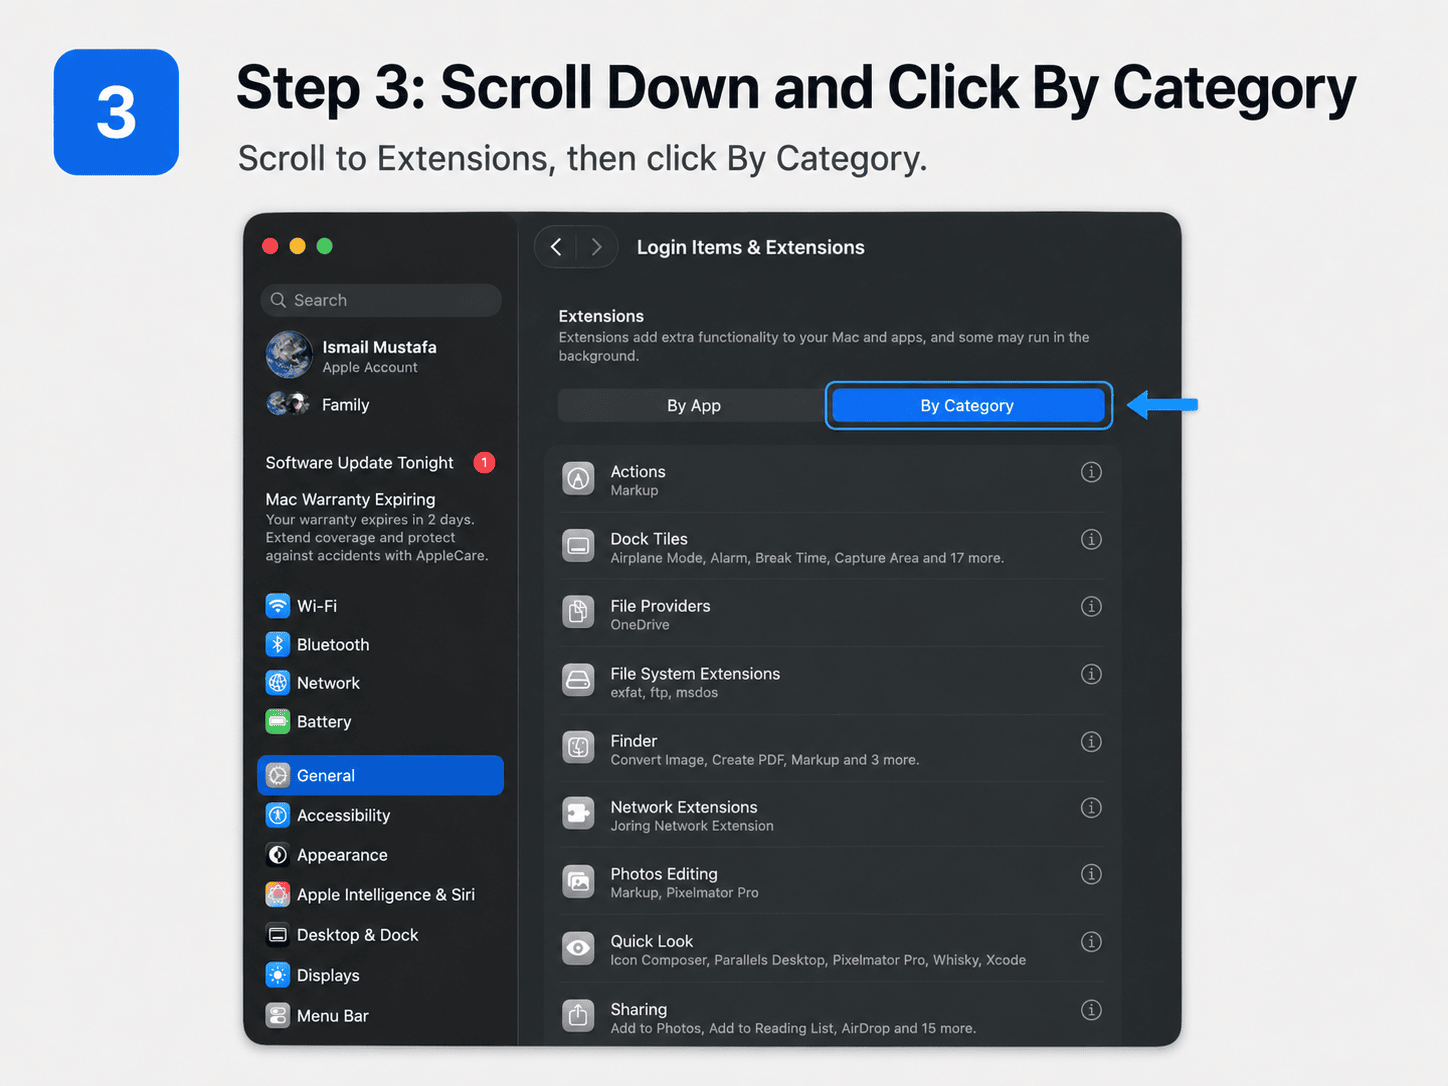
3. Scroll down to the Extensions section, then click By Category.
Login Items & Extensions opens on the login items list. Keep scrolling past it until you reach Extensions. It has two buttons, By App and By Category — click By Category.
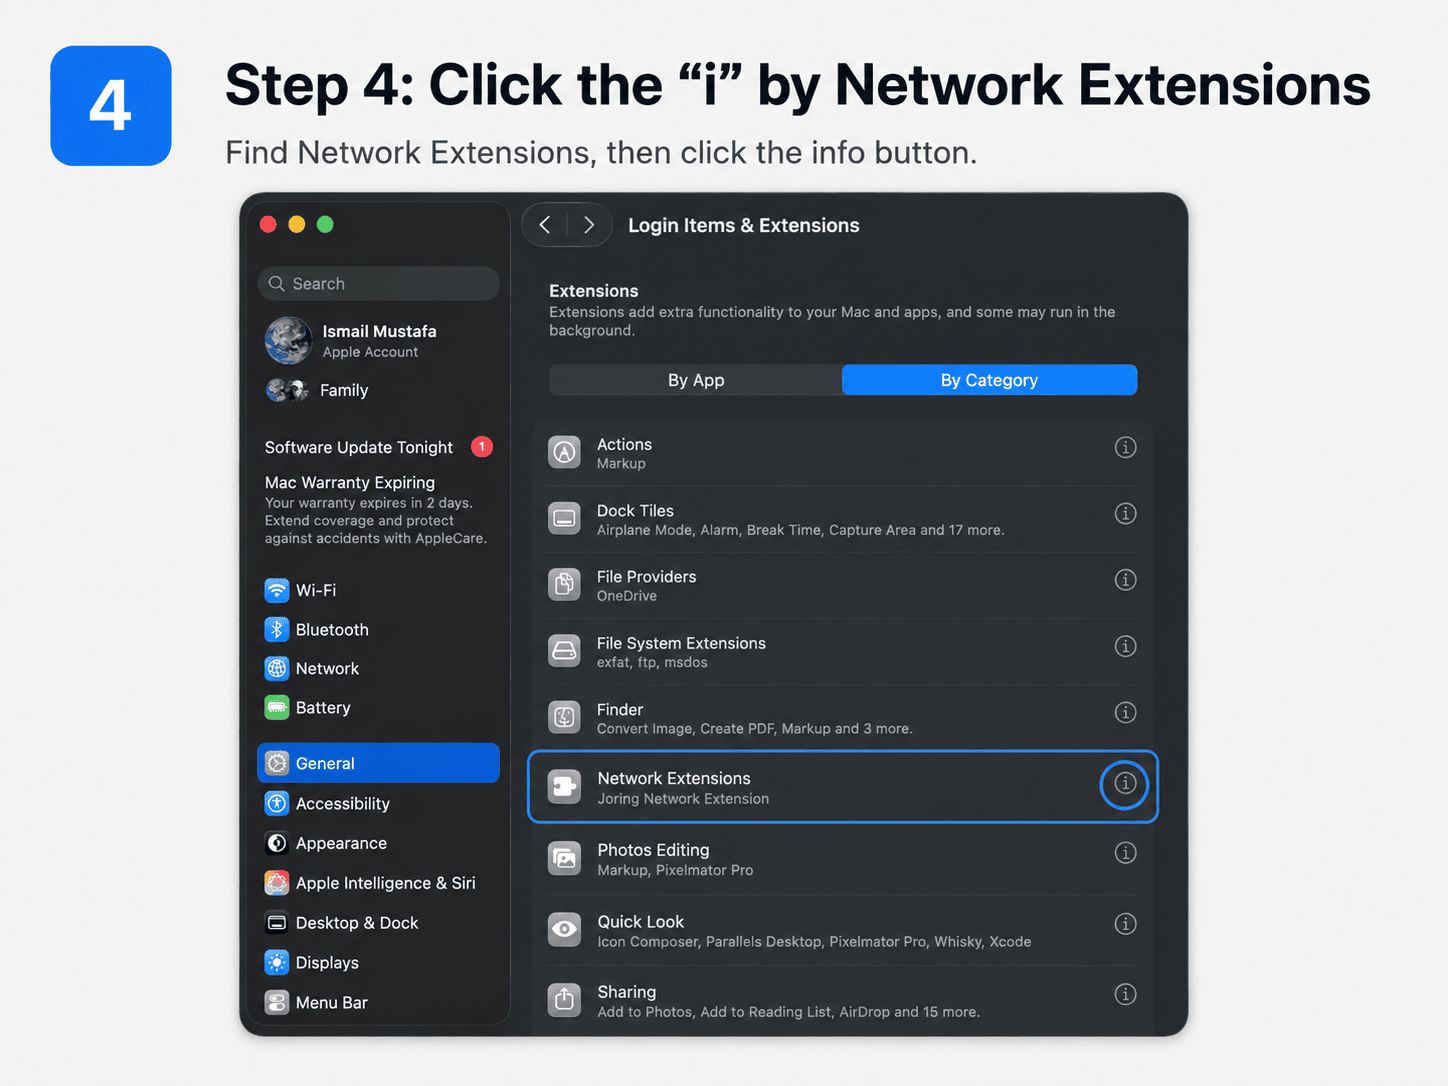
4. Find Network Extensions in the list, then click the ⓘ button on its right.
The row reads Network Extensions, with Joring Network Extension underneath it. Clicking the row does nothing; you have to click the small ⓘ info button at the far right.
5. Turn on Joring Network Host, then click Done.
A sheet opens listing every network extension on your Mac. Joring's is called Joring Network Host. Switch its toggle on, approve any macOS password or Touch ID prompt that follows, then click Done.
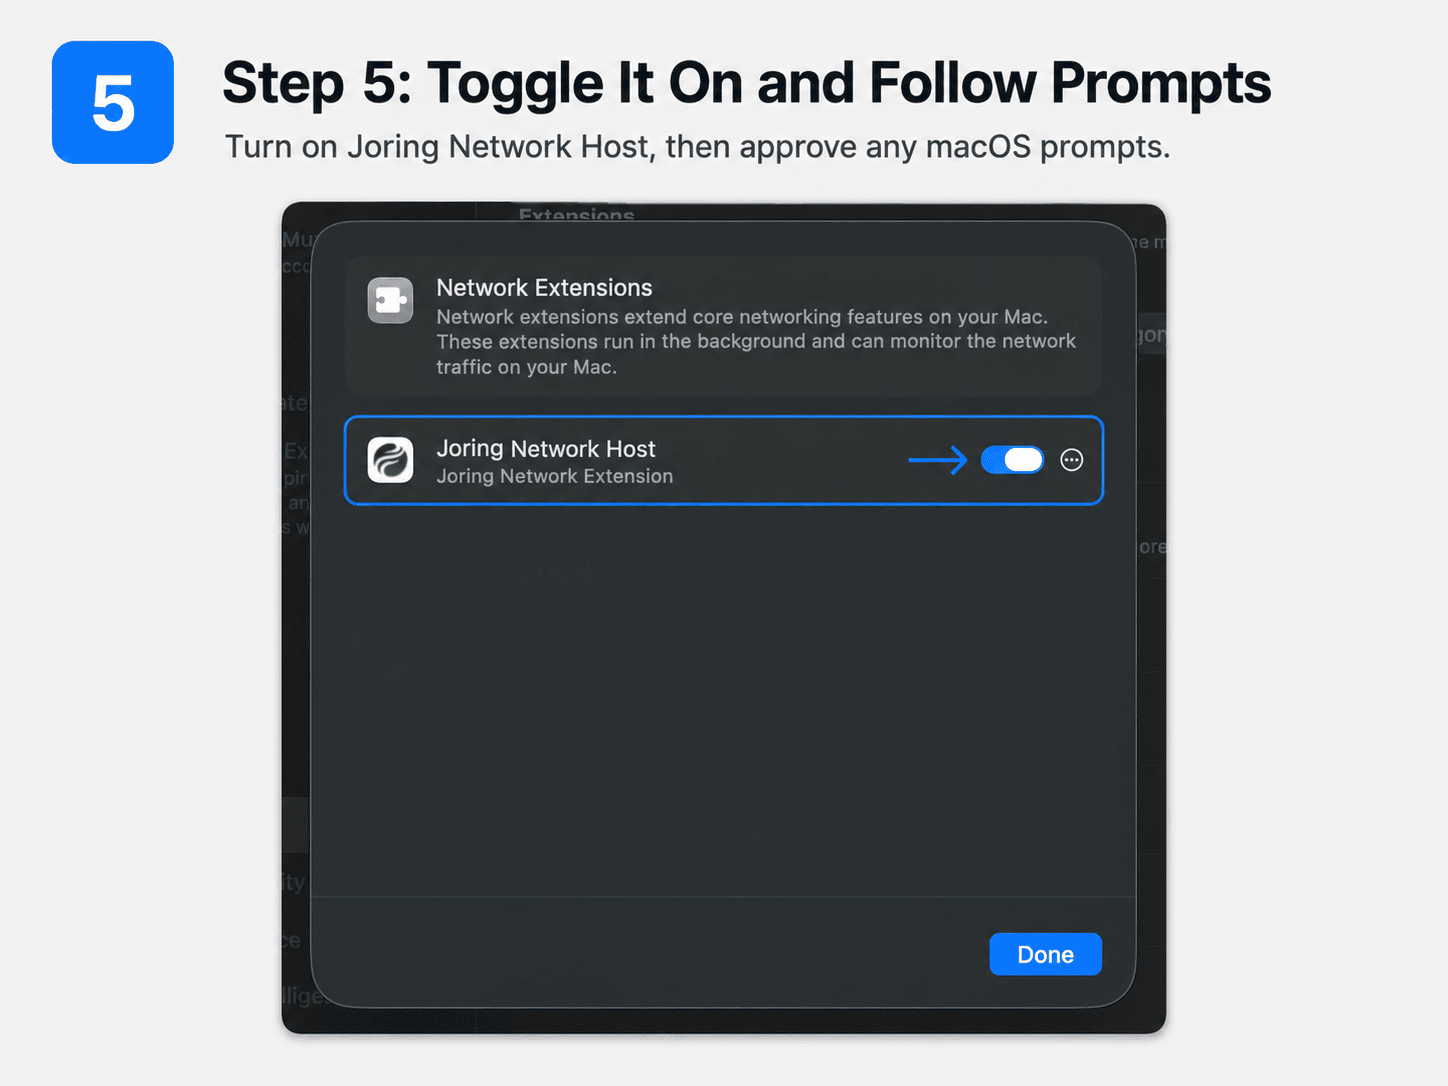
Capture starts on its own once the toggle is on. Go back to the Joring setup window and the Start capture step marks itself complete within a few seconds. If it does not, click Try again there.
Allow Accessibility access
Joring reads the draft in your AI app's composer to power the assist overlay that suggests improvements as you type. macOS gates that behind Accessibility.
In the Joring setup window, click Open Settings on the Accessibility step. System Settings opens on Privacy & Security → Accessibility. Turn Joring on in that list.
Capture works without this. Only the assist overlay depends on it.
Sign in
Click Sign in in the setup window. Joring opens your browser with a one-time code already filled in; finish signing in there with the account you use for Joring, and the setup window picks it up on its own. If the browser tab was closed, click Reopen browser.
When all three steps are complete the window closes itself and Joring keeps running in the menu bar.
Windows
Download and install the app
In Joring, click Set up Joring at the bottom of the sidebar, open the Desktop App tab, and click the .msi download button. You can also download it directly: Joring-windows-x64.msi.
Run the installer. It installs Joring for every account on the PC, so Windows asks once to allow it; you need an administrator account for that step. Leave Launch Joring checked on its last screen and Joring appears as an icon in the system tray. It starts on its own at every sign-in from then on.
Start capture and sign in
Click the Joring tray icon and click Start capture. Then click Sign in and finish signing in in the browser tab Joring opens.
Windows asks nothing more: the Joring Agent service the installer set up starts capture without a prompt, for administrators and standard users alike. There is no network extension approval and no Accessibility step.
Linux
Install the package
Joring ships as a .deb for Debian and Ubuntu (22.04 or later) and as an
.rpm for RHEL, Fedora and their derivatives, for x86_64 and arm64. The
quickest way in is the installer script, which picks the package for your
distribution, verifies it and installs it:
curl -fsSL https://joring.ai/cli/install.sh | shThe package installs the Joring app, the joring command and a small helper
service that runs as root. The helper is the one privileged part: it starts the
traffic redirector for your session and adds the capture certificate to the
system trust store, so nothing asks for your password after the install. The
installer asks for it once, for the package itself.
On Debian and Ubuntu the installer also adds Joring's apt repository, so
apt upgrade and unattended-upgrades bring in new releases.
Start capture and sign in
Open Joring from your application menu. It appears as a tray icon and starts on its own at every login from then on. Click the icon and click Start capture. Then click Sign in and finish signing in in the browser tab Joring opens.
Linux asks nothing more: there is no network extension approval and no
Accessibility step. Chromium-based apps such as Slack and Claude Desktop read
the certificate from your user's NSS database and Node-based tools from
NODE_EXTRA_CA_CERTS; Joring sets up both. Restart an AI app that was already
running so it picks up the certificate.
Confirm it is working
Open any supported AI tool and send a prompt. Within a minute it should appear in your activity in Joring.
If nothing shows up, click the Joring menu bar or tray icon. Every setup step should show as complete; the one that does not is the one to fix, and the window tells you what it is waiting on. Restart the AI app if it was already running when you finished setup — it picks up the new capture rules on launch.
If you prefer the terminal, the CLI reference covers the same checks as commands.
NextPrivacy modelSee exactly what Joring captures once it is running.